10 Minute Chicken Piccata


Quick and tasty Chicken Piccata. It takes about 10 minutes to make and tastes like a restaurant. I made this last night and I actually impressed myself!


  • 2 Boneless chicken breasts sliced in half or 3 slices
  • 2 TBS Butter
  • 1 TBS Olive OIl
  • 1/4 cup flour
  • 3/4 tsp paprika
  • 3/4 - 1 cup dry white wine (can give or take according to taste add more if you are increasing recipe size)
  • 3 TBS lemon juice (can give or take according to taste add more if you are increasing recipe size)
  • Salt
  • Freshly ground pepper (white or black) to taste
  • 1 TBS Butter (for sauce at finish)
  • 3 TBS capers
Chef's knive; platter for dredging; sautée pan.

RINSE chicken breasts under cold running water, drain, put on paper towel. Pat dry.

SLICE the chicken breasts to desired thickness 1/8 - 1/4" thick. Unlike veal, chicken is better cut than pounded thin.

MIX flour, paprika, salt and pepper

DREDGE chicken in flour mixture.

HEAT butter and olive oil in sautée pan over medium heat; be careful not to burn the butter, if using it. Add chicken breasts - do not crowd the pan. Sautée for about two minutes per side. REMOVE to a warm platter; you can place platter in warm oven.

ADD lemon and wine to pan; DEGLAZE (Dissolve the remaining bits of food) the pan using a wooden spoon or spatula to scrape. This is the basis for your sauce.

BRING to a simmer, reduce heat to medium-low, let sauce thicken.

WHEN sauce is thickened, swirl in butter. Add capers.

POUR pan juices over chicken. Serve.


Enjoy!    ~ Miss D' Lish


Miss D' Lish 
Is Excited To Announce..
"Our Sassy Lil' Cupcake Contest!"

Cupcake Provocateur was a total doll and decided to give us this adorable sassy retro vintage inspired "Betty Apron - In Zebra Safari" to give to one of our Miss D' Lish subscribers! Perfect for you or the Domestic Diva in your life!


WIN THIS!!!
Enter to win by Subscribing to our Blog & The Cupcake Provocateur Blog and leave us a comment below on "What is your favorite kind of cupcake and why you would like to win!" 

Contest Ends March 31st. 
Winner will be announced April 1st! No, this is not an April Fools joke! 


 If you haven't yet checked them out online you must! They have the cutest retro inspired aprons, couture aprons, children's aprons, baking inspired gifts, pot holders, kitchen towels, accessories and more ~ Please visit their website and check them out! They are amazing. I cant stop looking at all their cute stuff! www.cupcakeprovocateur.com.


~ Good Luck Doll's!


Junk Food Sushi ( Becca @ Blue Cricket Design)


My girls love to be in the thick of all I do. Be it cleaning or gardening, I can always count on having little shadows and helpers at my side! I love doing things geared towards their imagination and abilities! This is the PERFECT recipe for any young helper!

Photobucket

Junk Food Sushi is a concoction of all things kids love...

Photobucket

Twinkies! Fruit Roll Ups!! Candy!!!

Photobucket

I love the color of these Green Apple Fruit roll ups!!! They look as close to Seaweed
as you could get!!

Unroll the fruit roll up and using a pizza cutter slice it in 6 strips.

Photobucket

Now you will slice each Twinkie into three equal parts. Wrap a slice of the Fruit roll up
around each piece of Twinkie leaving the cream filling sides exposed.

Photobucket

Now comes the fun part! Add your favorite small candies! I always add a Swedish Fish!! It is "Sushi" right!!!! We also added sour Gummie Worms that I cut in half and Tropical Flavored Skittles! Other candies to consider using are Red Hots, Licorice Pieces,
Mike 'n Ikes and Jelly Beans! Anything small and colorful!

And VOILA!!! A super yummy tasty treat!
(I personally hate Twinkies and the taste of these but I'm a mom!!)
Kids LOVE 'em and why wouldn't they! Sugar!Candy! Junk Food!!!!

Hooray!!!!!!


Baby Chick Cupcakes

I know what your thinking...Easter?!?....What about St. Patrick's Day....well I promise I will have some cute St. Patricks Day posts to come... but I saw these darling Easter Cupcakes on the Food Network website and I couldn't resist these adorable spring treats!

Ingredients

  • 1 vanilla cupcake, recipe follows
  • About 1/3 cup White Fluff Frosting, recipe follows
  • Green coconut grass, recipe follows
  • 6 small candied malt balls (2 yellow, 2 pink, 2 white)
  • 1 yellow chick peep
  • White Airhead candy

Directions

Frost a cupcake with fluff frosting. Press a circle of coconut grass on top. Nestle the malted eggs on top of the grass. Gently press the peep onto the center of the grass. Cut the white Airhead into a 1/2 oval shape; trim one side so it has a cracked egg jagged edge. Place egg next to chick.

Vanilla Cupcakes:

  • 2 2/3 cups sugar
  • 1 cup (2 sticks) unsalted butter, cut into 1-inch pieces
  • 2 large eggs
  • 2 large egg yolks
  • 2/3 cup milk
  • 2/3 cup water
  • 2 1/2 teaspoons pure vanilla extract
  • 2 2/3 cups all-purpose flour
  • 1 1/3 cups cake flour
  • 4 teaspoons baking powder
  • 1/2 teaspoon fine salt
Preheat oven to 350 degrees F. Line two 12-cup cupcake tins with paper liners. (To avoid cupcakes sticking if they overflow slightly, lightly spray the tops of the pans.) Put tins on a baking sheet. Set aside.
Process sugar and butter in a food processor until very creamy, scraping sides as needed, 1 to 2 minutes. Add the eggs and yolks, one at a time, pulsing after each addition. Add the milk, water, and vanilla and process to blend.
Whisk both flours, baking powder, and salt in a medium bowl. Add the dry ingredients, in 3 batches to the wet, pulsing, and then scraping batter off the sides of the processor as needed after each addition. Process until the batter is very smooth and pourable like pancake batter, about 2 minutes.
Evenly pour the batter into the prepared cups, filling them 3/4 of the way full. Bake until the cakes are just firm and spring back when gently pressed, and the tops are golden, 18 to 25 minutes. Cool slightly in tin, and turn out of tin when cool enough to handle. Cool cupcakes completely on a rack before frosting.
Yield: 24 cupcakes
Prep Time: 20 minutes
Cook Time: 25 minutes
Inactive Prep Time: 30 minutes
Ease of preparation: easy

Fluff Frosting:

  • 1/4 cup whole milk
  • 2 teaspoons pure vanilla extract
  • 10 tablespoons unsalted butter, softened
  • 5 cups confectioners' sugar
  • 1/2 cup marshmallow fluff
  • Pinch fine salt
Whisk the milk and vanilla extract together in a small bowl.
Slowly beat the butter and sugar, in another medium bowl, with an electric mixer until incorporated. Raise the speed to high and mix until light and fluffy, about 5 to 7 minutes. (Occasionally turn the mixer off, and scrape the sides of the bowl down with a rubber spatula.) Add the fluff and salt and reduce the speed to low. Add the milk and vanilla mixture, scrape the bowl down, and mix until fully incorporated. Raise the mixer to high and beat briefly until fluffy, about 1 to 2 minutes. Frost cupcake immediately.
Yield: 3 3/4 cups
Copyright 2009 Television Food Network, G.P. All rights reserved

Coconut Easter Grass for Cupcakes:

  • 2 cups sweetened shredded coconut
  • 1 to 2 teaspoons liquid green food coloring
  • 1/2 to 1 teaspoon liquid yellow food coloring
Preheat oven to 250 degrees F. Line a baking sheet with parchment paper. Place a mesh rack on top, if available.
Put coconut in a shallow bowl. While tossing with a large spoon, add food coloring drop by drop until the desired color is reached. A little more green than yellow makes a pretty grass color. Add a few tablespoons water to moisten the mixture and help disperse the color evenly. If the color is too dark, add additional water, as needed, to dilute to the desired color. Drain the coconut in a sieve or strainer.
Spread the coconut in an even layer on the rack, or directly on the lined baking sheet. Place in the oven until dry, about 10 to 15 minutes. Use immediately, or store in covered container for up to 3 days.
Cook's Note: Food coloring can be messy and can stain your skin. To prevent this, wear latex gloves. You may find it easier to color the coconut in a large zip top plastic bag, tossing it to color evenly.
Yield: 2 cups coconut grass

Tomato Basil Pizza (Jessica MacDonald)

FRESH Tomato Basil Pizza

Ingredients:
Pre-made Pizza Crust (Boboli Brand)
Olive Oil
Jarred Minced Garlic in Oil
Mozzerella cheese
Pizza Sauce I use Boboli Brand
Parmesan Cheese
2 small oval shaped tomatoes
fresh package of basil leaves
pepperoni (optional)


Preheat oven to 325

Take your pre-made pizza crust and drizzle with olive oil spread on the pizza crust
Take a big heaping scoop of minced garlic and add to the crust. I use a lot I might even add (2) scoops its not as strong as fresh garlic so use a lot and spread all over crust and sprinkle crust with Parmesan.

Bake the crust at (325 -just the crust for 5 minutes - you can add a few more minutes but watch it closely) 

Once the crust has had some time to bake in that flavor, take it out and spread your sauce. Add your mozzerella cheese. Thinly slice the oval tomatoes and spread all over pizza I add a lot of tomato covering every space. Add fresh basil leaves -  but leave half to add after baking. Add pepperoni (optional. I make half with tomato and pepperoni for my son. He doesnt like the basil so I do half tomato and basil for me :) Sprinkle parmesan all over the top.

 
oval tomatoes are very tasty

Bake again at 325 until cheese is melted about 10 min. If the basil has burnt toss it and add fresh. I always add fresh leaves to the pizza after baking - basil tastes it's very best fresh on this pizza. This is my favorite recipe and its pretty easy. I added lots of short cuts!

Walnut Banana Bread (Jessica MacDonald)

Walnut Banana Bread
Ingredients
1 cup granulated sugar
8 tablespoons (1 stick) unsalted butter
2.25 oz bag of chopped unsalted walnuts
2 large eggs
4 ripe bananas
4 tablespoon milk
1 teaspoon olive oil
1 teaspoon ground cinnamon
2 cups all-purpose flour
1 teaspoon baking powder
1 teaspoon baking soda
1 teaspoon salt
1 teaspoon vanilla extract
dust of powdered sugar to the top after baking (optional)

 Instructions:
Mash banana, mix in with eggs, butter, sugar, milk, oil and spices. Add rest of ingredients. Spray bread pan with pam. Add to bread pan. bake in bread pan 75 min at 325 - cool and serve.

Its so good....

Fresh & Fit Lunch Boxes

Check out the new Fresh & Fit lunch boxes. These things are so cute! 


They are designed like cute purses in all sorts of colors and styles. 


They have coolers with 3-4 mini Tupperware pieces inside. You can pack healthy lunches and save money - break the habit of eating out everyday! best part I found them at TJ Max! I am trying one out today, I packed a nice salad with dressing on the side a cup of fruit and cottage cheese. 

A great way to make a healthy lunch to go!


Your Best Valentine's Day Desserts 

When we set out looking for valentines day treat ideas, we thought ...where better than the Martha Stewart website! We were right she had some great ideas. I picked a few selections to share with you that can be done quickly and easily. The thing about Valentines Day is we all want to make impressive treats but we also want our time for romance. Here are some quick and easy shortcuts. 

(All pictures and ideas are from www.marthastewart.com) If your feeling really crafty and would like to make the homemade delicious from scratch versions please check out her website :)

Layered Heart Cupcakes

You will need:
silver muffin cups
Pink doilies (optional but a cute touch)
Box of chocolate cake mix
tub of pink frosting.

Bake cupcakes as directed and let cool. Cut the tops off chocolate cupcakes, Frost the bottom half of the cupcake saving the top. Punch a heart shape using a cookie cutter, then replac the top onto the cupcake. Fill the heart with more frosting to create a beautiful color combination of dark brown & pink.

Cocoa with Marshmallow Hearts

You will need:
Hot Cocoa Mix
Marshmallows
Tiny heart shaped cookie cutters
Red Mugs (optional but pretty presentation)

Make the hot cocoa mix as directed. cut the marshmallows in half to more easily be able to cut through them with the cookie cutter. punch through the marshmallow with the cookie cutter. Use both pieces of marshmallow to decorate the cocoa. 

Mini Valentine Message Cakes

You will need:
Mini heart shaped cake or muffin pans
Cake mix, any flavor
pastel icings or pastel fondant
reg tube of icing to write with
Smoothing knife or use the back of a butter knife


Make cake mix as directed bake and cool. Spread icing or fondant smoothly. Add your special messages (or maybe a marriage proposal...)

Heart Shaped Pancakes

You will need:
Pancake mix
A steady hand
Syrup


Mix up the pancake mix as directed on package. Pour in a heart shape. Steady hands needed - you may have a few that don't turn out....but practice makes perfect and this is sure to make your hunny bunny start his day with a smile....and your little one's too!
Send us your Valentines Day recipes, pictures, ideas, information, and stories. We wanna hear from you! Happy Valentines Day.... 
~ Miss D'Lish


Best Ever Sugar Cookie


Ok...So you know when you find the best recipe EVER and inside your head you hear a sneaky little voice that says

"Ooh!!!! You should never ever ever in a million years share this recipe with a single soul because then you can be the queen of (fill in the blank) making and everyone will think you're fabulous and envy your baking skills and wish they were you!"

Well...this is one of those recipes but I told that sneaky little voice to hit the road!

This here Sugar Cookie recipe is the BEST! My dear friend Aspen shared this with me 4 years ago and ever since I've been so loyal to it I can't bare to try another! They are moist and Soft and the perfect dough for any holiday! Cookie Cutters turn them into the perfect Halloween Bats! Best Ever Spring time Flower and of course the best heart shaped Valentine treat!

Best Ever Sugar Cookie


Blend together until smooth:

1 1/2 Cup Sugar
1 Cup melted Butter
1 Teaspoon Vanilla
2 eggs
1 Cup Sour Cream

Combined in separate bowl:

5 Cups Flour
1/2 Teaspoon Salt
1 Teaspoon Baking Soda
1 Teaspoon Baking Powder


  • Add dry ingredients to wet and mix until combined.
  • Make a ball out of the dough and wrap in plastic wrap. Store in the fridge 2-3 hours or until firm. Over night works well too.
  • Once dough is firm roll out a portion of the dough onto a floured surface. You want the dough thick. I roll mine out to be about 1/3" thick!
  • Cut with cookie cutters and place on greases cookie sheet.
  • Back at 375 for 10-12 min. You don't want them golden brown. They will be the same shade as the uncooked dough.


To make the perfect glossy and smooth frosting simply warm in your Microwave a can of Strawberry Frosting for about 30 seconds. Stir it and warm it longer until it's soupy. Dip your cooled cookies face down into the frosting and let the excess frosting drip off. Add Sprinkles right away so they can stick well. When the frosting cools it dries smooth!


These are perfect for Neighbors and Teachers or to eat all by yourself! Don't ask me how I know!!!

Enjoy!!!


Lean & Mean Meatloaf (Gena Lee Nolin-Hulse)

 Gena Lee's ~ "Lean & Mean Meatloaf"!!

Just wanted to thank Gena Lee Nolin-Hulse for contributing this great recipe! I am all for healthy alternatives to great traditional dishes and this one is EXACTLY THAT!! Can't wait to try her Lean & Mean Meatloaf recipe.


Gena Lee's ~ "Lean & Mean Meatloaf"!!

Depending on how many you're feeding.. I always go for more so we have left overs.

  • @ least 3lbs of Lean Ground Turkey
  • 3 eggs
  • 1 1/2 c. Honey BB-Q Sauce
  • 1 pkg. of Crumbled Crackers - ( saltines)
  • 1 pkg. of Ranch Seasoning
  • 1/2 white onion (minced up)
  • 1 tsp. Cracked pepper
  • 1/2 tsp. Garlic powder or Fresh pressed Garlic

I always combine my eggs, bb-q sauce & mixture without the turkey, so its mixed well before adding the meat. Then, with your CLEAN hands, get down and dirty -- Mix it up!


On a cookie sheet lined with foil, create a large almond shaped mound with your turkey... Once you've made the perfect mound, drizzle honey BB-Q sauce until completely covered. Mmmmm...

Cover with foil and bake for 1-1-1/2 hours at 400'... Or I use a probe until the meat reaches 170 degrees.


The last 15-20 minutes take the foil off so you get a crisp, golden meatloaf!

I always serve with a fresh vegetable & yummy mashed potato's!


Enjoy!

Brigadeiro - Brazilian Candy (Lara Marotta)

 Brigadeiro Brazilian Candy

Valentines Day is near so I'm really excited about Lara's recipe! We need some new Valentines treats! I can't wait to try this one out it looks d'lish!

Here's her Recipe:
Brigadeiro is a traditional and easy to make Brazilian candy that everyone likes! You will find these at birthday parties and maybe even at a special dinner. To make this, follow the steps below.

1 can sweetened condensed milk
3 tablespoons cocoa
1 tablespoon butter
1 package chcocolate sprinkles

1. In a medium saucepan combine condensed milk and cocoa powder and butter. Stir until completely dissolved.

2. Put the saucepan on low heat and stir the mixture constantly with a wooden spoon or spatula.

3. Continue stirring on low heat until you are able to see the bottom of the pot when you tilt the pan, the mixture will get thicker in consistency. This should take 10-12 minutes.


4. Now pour the mixture onto a lightly greased plate or cookie sheet. Spread the mixture thinly and evenly
5. Allow to cool for around 10-20 minutes or until mixture does not move or slide off the plate.
6. Grease hands with butter and roll mixture into teaspoon sized balls and coat with chocolate sprinkles.


Extra tips:
You can use other ingredients to coat the brigadeiro with, such as coconut flakes, unsweetened cocoa, crushed nuts... etc.


You can also add some dark rum to the mixture as well.

A creative way to display the little sweets is in mini cupcakes holders.

You can add or subtract how much cocoa you want to add to the mixture according to your taste.

Do not use non-fat condensed milk, otherwise it won't hold shape.

Hot Dog Doggies (Fallon DuBois)

 Hot Dog Doggies

This is the most adorable recipe. I remembered it from one of Allison DuBois Facebook posts and with her permission I am sharing this adorable recipe her daughter Fallon made all by herself with the help of a fun cookbook!

This is a great project to let your kids try all by themselves, or a fun project to do with your kids! Great for parties or just a fun way to encourage your kids to eat their dinner.


 Ingredients:
Pillsbury Crescents
Hot Dogs (Inside Rolls and Head)
Sweet Tomato's Sliced Long (for tail)
Cherry Tomato's (Head)
Sliced Pickle's (Ears)
Chopped Black Olives (Eyes)

You Will Need:
Tooth Picks

Instructions: 
Preheat oven as Pillsbury Crescents package instructs.
Roll hot dogs in Crescent dough.
Bake as instructed on crescent package
Cool
Decorate using ingredients above! Voila!


Our compliments to the Chef! Thank you for the fun share! Can't wait to try this one at home!!

Spectacular Birthday Cake "Ace of Cakes"

Spectacular Birthday Cake

Allison DuBois was so kind as to give Miss D'Lish permission to post a few pics of her daughter Sophia's birthday cake from "Ace of Cakes". What a fabulous cake! This stunning cake was blueberry muffin, white chocolate and raspberry! And according to her picture post it was "unbelievably good"...WOW!


Check out the detail! What a fabulous, awesome birthday cake! Sophia sure is lucky! Thanks Allison!
 

Chicken Tetrazzini (Nancee Rose)

Chicken Tetrazzini   

Ingredients:
4 chicken breast halves (on the bone preferred)
One half med. Onion – chopped
2 or 3 stalks celery – chopped
One pound fresh mushrooms - sliced
One pkg shredded cheddar cheese
One can cream of chicken soup
One-cup sour cream
One half-cup red cooking wine
Salt & pepper to taste
Spaghetti pasta (boil about a one & a half inch diameter bunch of raw pasta)
Parsley
Breadcrumbs
Parmesan cheese

Directions:
1. Boil the chicken breast in approx. 4 cups of water with onion and celery. (can add
one can of chicken broth or bouillon)

2. Boil pasta until firm doneness

3. Take out chicken when done & cool, leaving onion and celery in broth, add sliced
    mushrooms to broth and simmer until reduced in size.

4. Meantime, in another saucepan, heat soup, sour cream, wine, and one cup of
    chicken broth (from simmering mushrooms). Do not boil - when at a simmer add
    cheddar cheese and turn off heat. Stir until well mixed.

5. Debone chicken, chop strain mushrooms, onions & celery from broth (can save broth and
    store for future use)

6. Mix all ingredients: chicken, cheese sauce, mushrooms, onions, celery & spaghetti. Add
    salt, pepper and parsley as desired.

7. Put mixture in a greased casserole. Top with Parmesan cheese, breadcrumbs & parsley.

8. Bake at 350 for 20 to 30 mins, until bubbling


Cranberry Sour Cream Coffee Cake (Nancee Rose)

Cranberry Sour Cream Coffee Cake

1 stick butter / margarine
2 eggs
1 cup (pint) sour cream
1 cup cut cranberries (cut in half)
1 cup sugar
2 cups flour
1 t. baking powder
1 t. baking soda
½ t. salt
1 t. almond extract
½ c. walnuts (or more)

Cream butter, add sugar, add eggs one at a time mixing in between.  Add sour cream, almond flavoring, mix well.  Add sifted dry ingredients, mix.  Add cranberries & nuts.  Pour into well greased bundt pan.  Bake at 350o for 55 minutes. 

When cool, drizzle with icing.  ¾ c. confectioners sugar, 1 T. water, 1 t. almond extract.

Chicken Marsala (Nancee Rose)

Chicken Marsala


4 chicken cutlets – skinless & boneless
2 Tbsp flour
1 Tbsp butter
1 Tbsp olive oil
2 cups mushrooms, sliced
3/4 cup marsala cooking wine
1/4 cup water
2 Tbsp fresh parsley – chopped
1/4 tspn rosemary (optional)

Pound chicken into thin cutlets. Dredge on both sides in flour. In a large skillet, on medium heat, sauté mushrooms in melted butter and olive oil until browned, about 10 minutes. Remove & set aside. Add chicken to the pan and brown, about 4 minutes on each side. When cooked through, remove to a plate. Return mushrooms to the pan, and ad the marsala wine, water and herbs. When slightly thickened, pour over chicken and serve.


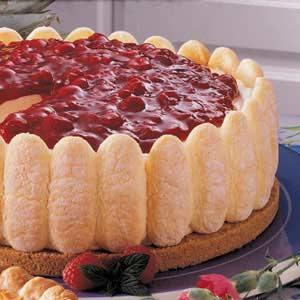
No Bake Cheesecake with Ladyfingers (Nancee Rose)

No Bake Cheesecake with Ladyfingers 

Ingredients:
3 pkgs Ladyfingers
1 – 8oz pkg cream cheese +1 – 3oz pkg cream cheese
1 pint whipping cream
3/4 cup sugar
1 tsp vanilla
Topping: 1 can pie filling or * fresh berries with cooked berry glaze.


Directions:
1. Line outside edge & bottom of a spring form pan with ladyfingers. (flat sides facing inward)
2. Whip softened cream cheese, add sugar & vanilla. Whip all together.
3. Whip whipping cream, on high, until stiff.
4. Fold whipping cream into cream cheese mixture.
5. Pour half of whipped cream mixture into ladyfinger lined pan. Spread evenly. Place another layer of ladyfingers on top. Pour remainder of  whipped cream  mixture on top.
6. Pour 1 can of berry pie filling on top & chill.


•    For Fresh Strawberry Topping:
1.    32 oz fresh strawberries; rinsed and tops taken off – drained on paper towels
2.     1 cup sugar
3.    2 Tbls corn starch
4.     a small squeeze of fresh lemon juice

Directions:
 Place 2 cups cleaned & sliced strawberries sugar, corn starch & lemon juice in a sauce pan. Smash berries, stir all ingredients until mixed. Heat on stove over medium heat until thickened. (will appear glossy)  cool.

Pour on top of cheesecake. Place the remainder of whole fresh strawberries on top of cooked berry mixture.

Cover loosely and refrigerate for several hours before  serving.

Homemade Pasta

 Homemade Pasta

I found this super easy and fun Pasta recipe on Pioneer Woman's website! It had a step by step recipe that was so easy to follow! It's so much fun to make with your kids! Let's get started!

The recipe calls for only two ingredients!!!! Gotta Love that!!!

1 egg for every 1/2 cup of flour! That combo is the perfect amount per person so for our family of four I used 4 eggs and 2 cups flour!


Combine eggs and flour in large bowl and mix with your hands till you create a dough ball.Work the dough on a floured surface till it's smooth and not tacky.


Separate your dough into manageable portions to roll out. I separated mine into two. Roll out the dough as thin as you can.

I used a pizza cutter to cut very thin straight strips.
Gently peel the strips off the cutting surface and collect on a plate.
Add cut pasta to a boiling pot of salted water and cook for approximately 2 min.

Drain and add your favorite pasta sauce!
Te Da!!! A super yummy, totally impressive, fun pasta dish!!! For reals guys! In the time it took the pot of water to boil we were ready to boil the noodles! This recipe is well worth the extra effort to make a snazzy meal your family will love! The kids loved being helpers and finding super long noodles to slurp!!! A new family hit!!!